
If you’re wondering how to remove bike pedals, wonder no more! This helpful guide will show you how to remove them step by step easily. Whether you need to do some maintenance on your bike or simply want to take them off for storage, follow these directions, and you’ll have those pedals off in no time.
Tools Required To Change Bike Pedals
The majority of pedals may be installed and removed using either an 8mm Allen (hex) key or a 15mm spanner.
A 15mm spanner is required if the spindle between the pedal body and the crank on your pedals has parallel sides.
Any 15mm spanner will do as long as it can fit between the pedal body and crank without being too fat. An adjustable spanner might be difficult to fit in there.
Some pedals have a larger locking nut next to the wrench flats, such as more expensive Shimano pedals. Don’t be fooled by this; these are used to access the pedal’s internal components for service.
Some very antique pedals may have flats that measure 9/16 inches. Only the earliest bikes are likely to have this, and as 9/16in is equal to 14.28mm, you might not even notice if using a 15mm spanner.

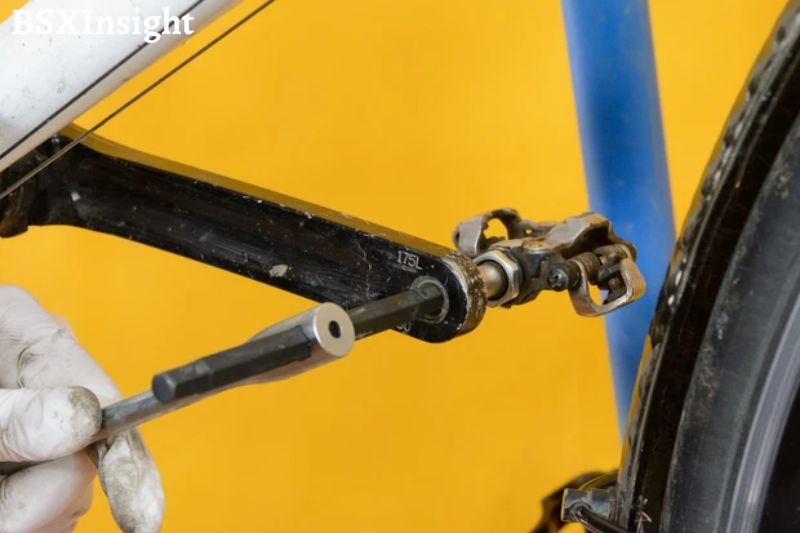
You will require an 8mm hex key if your pedals have a hexagonal socket on the end of the spindle (as viewed from the inside of the crank). Instead, a small minority of pedals employ a 6mm hex key.
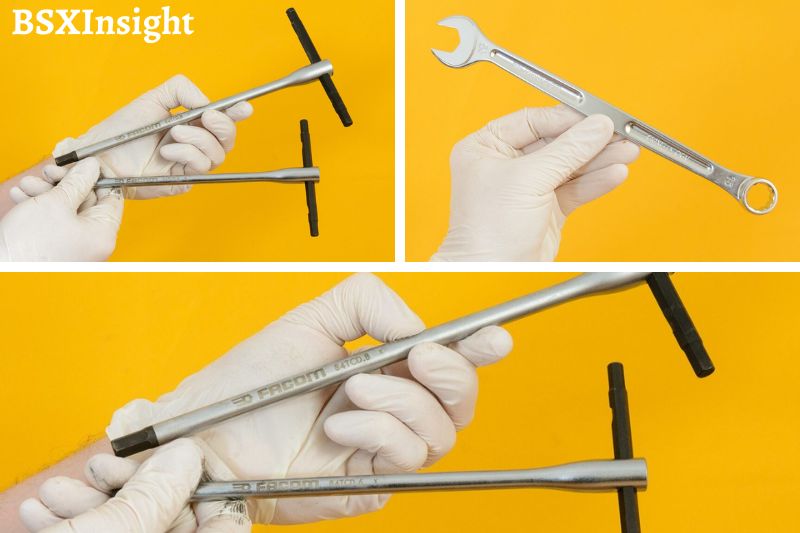
The best hex key for removing pedals has a long handle, and one with a sliding end in the shape of a T allows you to slide the long part of the hex key to avoid the chainrings on the bike.
Keep in mind that the crank end of the pedal spindle is always used to install or remove pedals. If the outside end of the pedal spindle on your pedals has a bolt, cap, or screw, it is only utilized to service the bearings.
Left vs. Right Pedals Explained – What Are The Differences?
The right pedal for each side of your bike must be fitted because the left and right pedals have different threading. For the sake of clarity before we continue:
- The bike’s drive side, or right side, is the side with the gears.
- The bike’s left side, often known as the non-drive side, is the side devoid of gears.
Right pedal threading
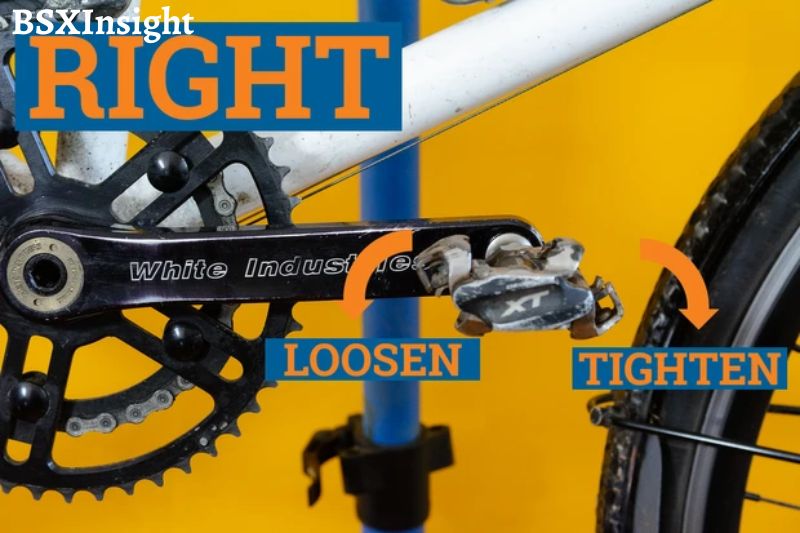
Pedals on the right side (drive side) are always standard-threaded. Accordingly, they turn the spindle in a clockwise direction to tighten and in a counterclockwise direction to relax. In other words, tighten with the right, and loosen with the left.
Left pedal threading
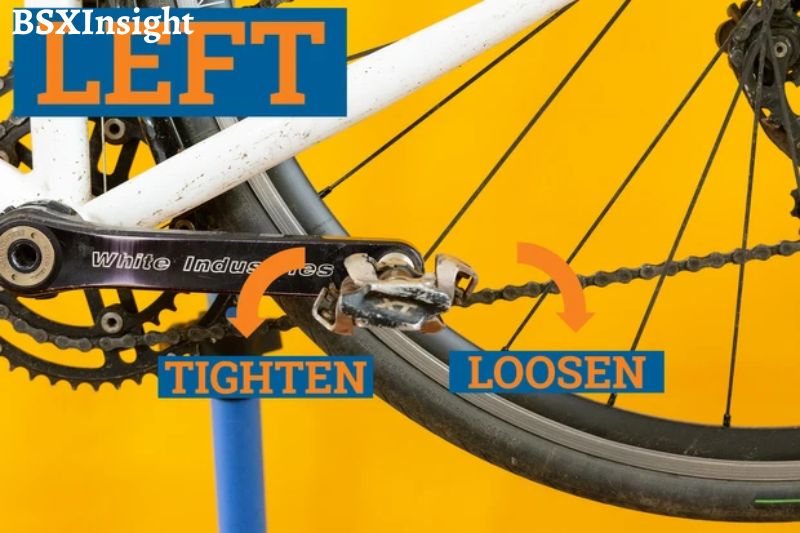
The pedals on the left (non-drive side) are always reverse-threaded. In other words, they turn the spindle clockwise to loosen and counterclockwise to tighten.
This is the opposite of the drive-side pedal, just to be very clear (and pretty much every other threaded part you are likely to encounter on a bike or in life).
How to tell apart left and right pedals?
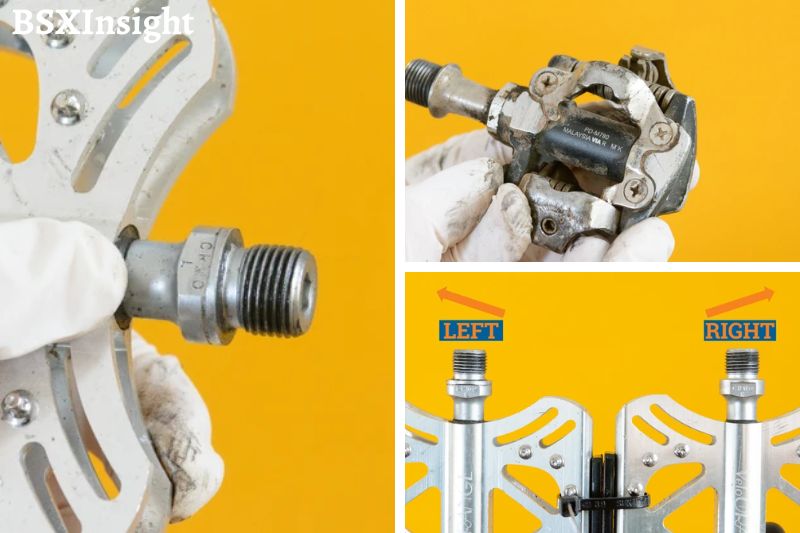
Fortunately, each pedal is labeled in some way to show whether it belongs on the left or right side of your bike.
The end of the spindle will, at the very least, have an L or R branded into it. Additionally, it may be printed or stamped onto the pedal’s body or the wrench flats.
In the absence of this, your pedal can instead feature a textured area close to the wrench flats that serves as a left-pedal indicator.
If your pedal lacks this as well, you can carefully inspect the pedal spindle’s threads.
A right pedal has standard threads that, when viewed, appear to be angled upward and to the right.
The reverse threading on the left pedal gives the impression that the threads are angled upward and to the left.
How To Remove Pedals From A Bike?
Step 1: Learn how to take your bike’s right (drive side) pedal off.
Turn your cranks so that the right-hand crank (the three o’clock position) is roughly pointing toward the front wheel when viewed from the drive side of your bike.
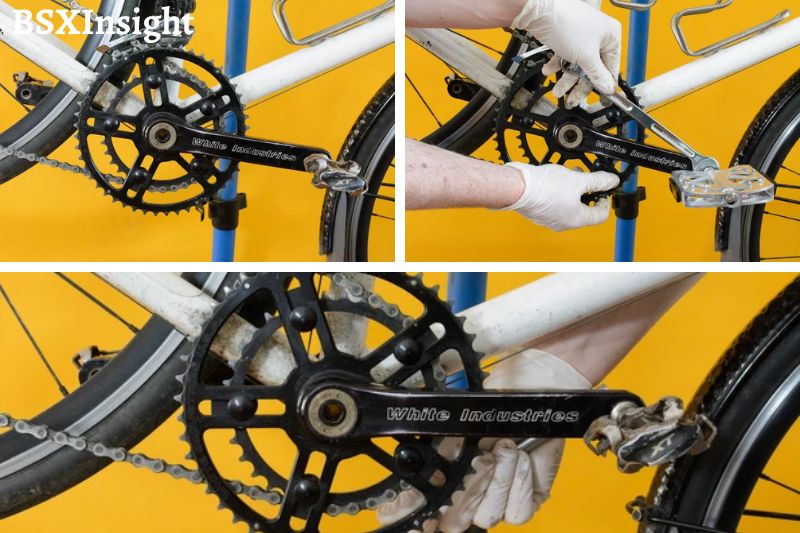
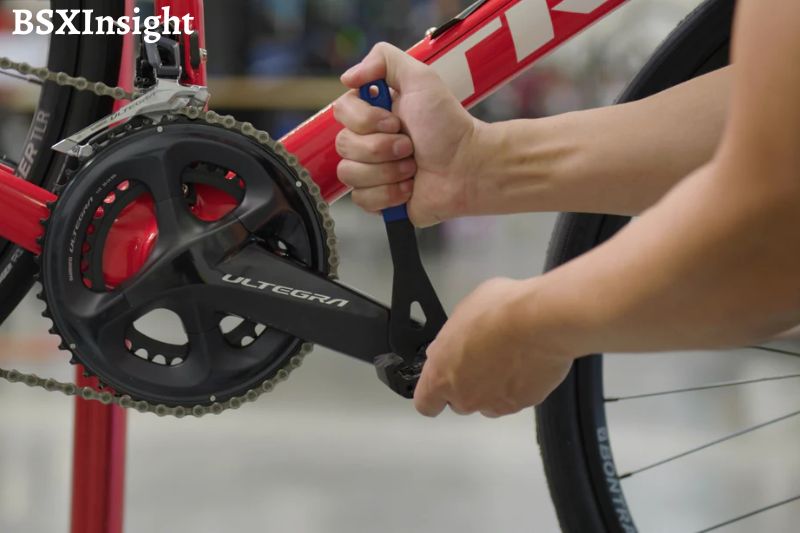
If your pedals have wrench flats, mount your spanner there with the pointed end facing the bike’s back.
If your pedals require a hex key, insert the short end into the back of the pedal with the long section facing the bike’s rear.
When your tool is ready, firmly press down on it while holding the opposing crank to release the pedal. The pedal can now be manually unscrewed once more.
This may need a lot of force if your pedals weren’t oiled when they were installed or if they just haven’t been removed in a while.
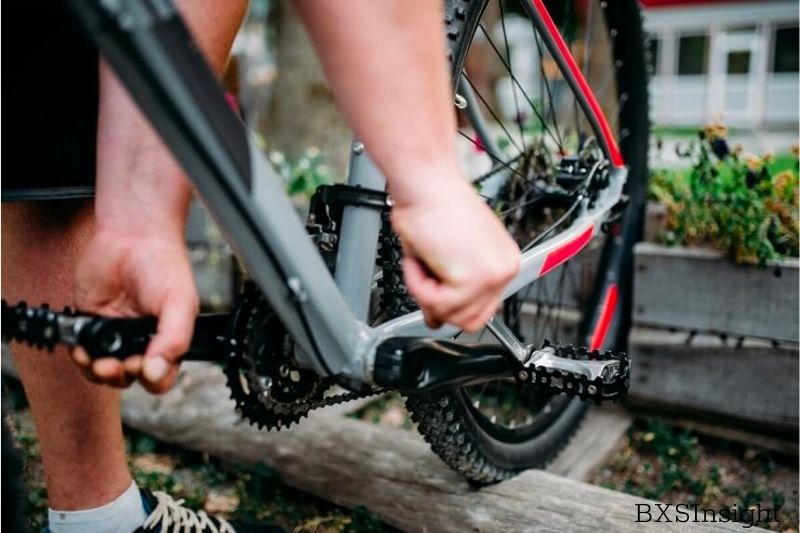
If you are unable to loosen the thread manually, slowly increasing your leverage with an old pipe or another tool may be helpful.
If you don’t have anything similar on hand, you might try setting your bike’s wheels on the ground while having someone hold it steady and apply further pressure on your foot.
Before doing this, make sure your tool is very securely attached to the wrench’s flat or hex socket. In order to preserve your floor, we also advise you to place a folded towel or old book behind the pedal.
Step 2: How to detach your bicycle’s left (non-drive side) pedal
Turn your left-hand crank so it is facing toward the front wheel at nine o’clock while looking at your bicycle from the non-drive side.
Place your tool so that it is pointed in the direction of the back of the bike by following the same exact procedures as before.
How To Change Bike Pedals
Step 1: Attaching your bike’s right (drive side) pedal

The threads on the crank and the pedals should both be properly cleaned if you have used pedals or a second-hand bicycle. Threads can be harmed and worn away over time by grit or grime.
Apply a light coat of grease or anti-seize to the threads on the pedal axle after cleaning the threads.
This action is crucially important. At best, installing pedals with “dry” threads can make it very challenging to remove the pedals. At worst, if you wait too long, your pedals and cranks can permanently fuse together.
Chain lube or other oils won’t work in this situation over the long run, so resist the urge to use anything other than grease or anti-seize.
Some pedals and cranks need a tiny pedal washer installed on the spindle before being installed. If you’re unclear, consult the owner’s manual for your crankset or bicycle.
Start by manually threading the axle in after lightly greasing the pedal axle. Turning the axle clockwise tightens the right-hand pedal.
The pedal should be manually threaded until it bottoms out on the crank. Once the pedal has bottomed out against the crank, lightly tighten it with your hex key or wrench.
The pedals only need to be snugly against the crank; they don’t need to be extremely tight. The only way to explain this is “wrist tight.”
Are You Certain you have the right pedal installed?
It can be impossible to thread worn-out cranks or pedals manually.
Before using your tools, be sure you are absolutely installing the right pedal. The left-hand pedal will not thread into the crank, and attempting to force it in would cross the threads and damage the crank of the bicycle.
Even seasoned mechanics can make mistakes in this situation if they are pressed for time, so take your time and make sure you’re doing it correctly.
You can try using your spanner or hex key to start things after you are positive you are installing the right pedal.
Step 2: Attaching the left pedal (drive-side) to your bicycle
The left-hand pedal is reverse-threaded. Thus the procedure is identical, but you tighten it by rotating the spindle counterclockwise because it is.
Once the pedals are in place, clean the crank of any remaining grease, and you’re ready to go.
Should You Grease Bike Pedals?
If you are having trouble with your bike pedals slipping, you may want to consider greasing them. This is a relatively easy process and only requires a few tools. First, you will need some grease.
You can purchase this at most hardware stores. Next, you will need a clean rag and something to pry the pedals off with, like a screwdriver.
To begin, remove the pedals from your bike. If they are stuck, you may need to use the screwdriver to pry them off.
Once they are removed, wipe off any dirt or grime that is on them with the rag. Next, apply the grease to the threads on the pedals. Be sure to get a good amount on there, but don’t go overboard.
Now, screw the pedals back onto the bike. Make sure they are tight but don’t overdo it. You don’t want to strip the threads. Once they are on, give the pedals a spin to make sure they are working properly. If they seem to be slipping still, you may need to add more grease.
How Tight Should You Torque Bike Pedals?

There is no definitive answer to how tight you should torque your bike pedals, as it depends on your specific pedals and bike. However, a good rule of thumb is to torque them to around 10-15 Newton meters.
This should be enough to keep the pedals from coming loose without being so tight that they are difficult to remove. If you are unsure, it is always best to consult your bike’s owner’s manual or a professional mechanic.
How To Install Pedals?
- You will find the letters “R” or “L” printed on the pedal’s spindle. Place it on the right side of your bike. If the markings are not there, make sure to check the threads of the pedals. Up to the right, goes to the right side, and up to the left.
- Use bike grease on the spindle threads.
- Place each pedal at a 90° angle into the crank arm of their respective crank arms. They should be easy to thread in place.
- Your pedal should be placed on the spindle flats.
- Turn the left pedal clockwise and the right pedal counterclockwise to tighten the pedals.
- To properly secure the pedal, you should feel resistance.
FAQs
How do I loosen a cross-threaded bicycle pedal?
Using a pedal wrench will be best to remove a cross-threaded pedal, but then what?
If you’re having difficulty getting your pedals in, it’s likely because they’re on the wrong side. Many people try to save money by installing pedals themselves, but this often leads to frustration and wasted time. If you bring your pedals to a professional, they will be able to help you get them on the right side and avoid any further issues.
There is a way to “save” cranks that had improperly installed pedals- using threaded inserts. The mechanic drills out the crank arm tap it, then installs the insert, usually using a high-strength epoxy (which takes 24 hours to cure). This repair should only be reserved for high-end cranks since the job costs about $60 per side.
Why can’t my pedals be removed?
Place the pedal wrench on your pedal spindle facing backward. Push down on the pedal. You can also ride the bike and push the pedal with your foot. The cycle should be against a wall or corner. You should feel the brakes begin to relax.
What direction do the pedals go?
Use a pedal wrench or a hex key to unscrew the crank arms from the pedals. Turn the crank arms counterclockwise to loosen the right pedals, while the left pedals reduce clockwise. Apply bike grease to new pedals, and screw them in at a 90-degree angle.
What other tools can I use in place of a pedal wrench?
You don’t need a pedal, so a standard 15 mm open-end wrench is sufficient. Next, look at your pedal to ensure it has a flat surface for your wrench to attach.
Video
Conclusion
It’s always a good idea to read the instructions and keep an eye on the safety signs while using machinery. This is a handy article for anyone thinking about removing their bike pedals. Have you ever removed them? What was the process like? Have anything to add to the article? Let BSXInsight know in the comments below!